Compressed Exploration – Part 1
When I’m working with engineers both new and old, one of the hardest things about mixing for people to get their heads around is compression. Today I have the first of a couple learning and exploration techniques you can play with if you’re trying to wrap your head around the mystery of compression.
Full disclosure: I didn’t come up with these techniques, but unfortunately I don’t remember exactly where I found them so my apologies to the inventors.
Both of these learning/exploration techniques are probably best accomplished with a DAW, but you could probably also use a console. I use Pro Tools in my studio so that’s what I used to create the examples here. Just make sure your DAW/console of choice can do some form of delay compensation because without it the second technique won’t work.
Aside from your DAW, you’re also going to need some sample audio. I’d suggest grabbing a multitrack recording so you can experiment with these techniques using different instruments. If you don’t have any recordings of instruments, Mike Senior has a great archive of multitrack recordings to go with his book, Mixing Secrets for the Small Studio. It’s a great book on mixing, and I highly recommend it as a resource. You can find his multitracks here. For the examples I’ve created, I used audio courtesy of Counting Crows, Telefunken, and Sweetwater Sound.
First up is the sine wave technique. You’ll need some audio of a sine wave or pure pitch, some audio of your favorite instrument(s) for testing, and a compressor with a sidechain option to try this out.
Import all your audio files into your DAW session. If you import multiple instruments, you’ll want to mute all of them except for the instrument you’d like to test first; personally, I think drums are a good place to start when trying to figure out compression. Next assign the output of your sine wave to your speakers/headphones/etc. and the output of your instruments to an internal buss. Insert your compressor on the sine wave’s channel and set the compressor’s sidechain input to the buss you routed your instruments to.
So what’s this going to do?
When you start playing all your audio, you should only hear your constant sine wave if you’ve set everything up properly. Now start adjusting the controls on your compressor. As you play with the compressor, you will hear the compressor acting on the sine wave the same way that compressor would act if you inserted it on the instrument you’re testing. The great thing about this technique is since the sine wave is a steady tone, it’s easier to hear the activity of the compressor as it acts on that tone.
When you try this make sure to play with all the controls. Listen to what different attack and release times do. Listen to how the ratio affects things. Try using lots of compression and just little bits. Make sure to try out different instruments as well. As I mentioned, I believe drums are a good place to start because of their short transient bursts, but make sure to play with guitars, vocals, pianos, marimba’s, kazoo’s, etc.
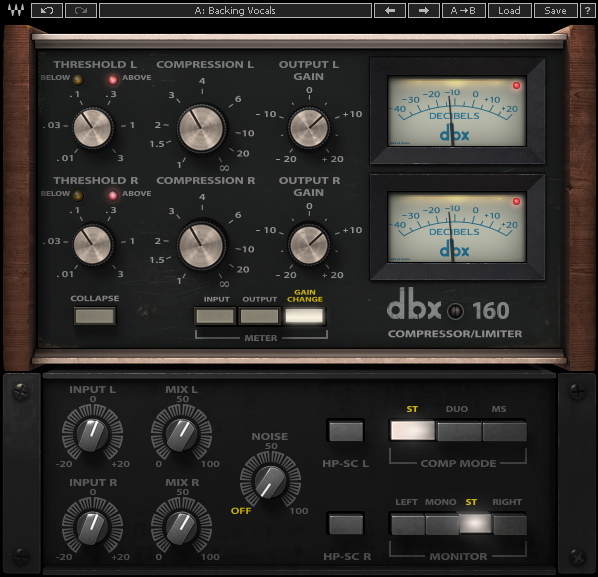
Let’s check out a real example of this technique. I used a 200Hz sine wave and a snare drum recording for this. I picked 200Hz because it’s almost bearable to listen to for extended periods. For a compressor, I chose the Waves dbx® 160 Compressor/Limiter because it’s one of my favorite compressor plug-ins right now, and it has our needed sidechain input.
First, let’s listen to the original snare and the snare after compression. I had the compressor doing about 5 dB of gain reduction along with another 5 dB of makeup gain, and I believe the ratio was set to 4:1.
Original Snare Drum: [audio:comp/sn-cln.mp3]
Snare Drum Compressed:[audio:comp/sn-dbx160.mp3]
Now, let’s use the sine wave technique to hear what the compressor is doing:
200 Hz Sine Wave: [audio:comp/200hz.mp3]
200 Hz Sine Wave Compressed: [audio:comp/200hz-snkey.mp3]
There are two things I immediately notice when listening to the sine wave under compression. The first is a level dip of the sine wave. When the compressor is triggered by the snare’s initial transient, we hear the sine wave dip in level as the compressor applies gain reduction, and then the sine wave’s level comes back up as the compressor releases. This is basic compressor operation.
The second thing I hear is part of what excites engineers like me about compression. Did you notice that little pop just as the tone’s level dips? That’s actually distortion, and it’s one of the artifacts we sometimes get using compression. Sometimes distortion is undesirable, but in this case it’s actually a good thing because it’s adding snap to the drum.
One of the things about the dbx® 160 that makes it a popular compressor on drums is the added snap it can give. Go back and listen to the two snare audio samples. If you didn’t notice it before, can you hear that extra thwack the compressor gives the snare now? That extra thwack can help give the snare added punch and energy in the mix. In addition, the body of the snare is brought up thanks to the compressor’s makeup gain. So the compressor is adding some snap up front as it brings the level of the snare’s initial transient down while the compressor’s release brings up the body of the snare giving us a punchier and fatter drum.
This is the reason why many mix engineers like myself don’t always use the same compressor on everything. Different compressors do different things on different instruments. In this case, we get that added snap from the 160, but not all compressors add that. The 160 doesn’t have adjustable attack and release controls, and if it did we could probably change that characteristic a bit.
This is part of why the sine wave technique can be so interesting. It’s a way to hear how the different controls on a compressor affect things, and how different compressors act on different instruments.
How about another example. Let’s try using a bass guitar this time with the same compressor. Here’s the original bass guitar:
[audio:comp/bass-cln.mp3]I like this clip as an example because the first thing I notice when I listen is the volume of the playing can be a little inconsistent at times. This is very typical with bass guitars, and one of the reasons compressors can be their friend. If you’re having a hard time hearing this, listen around 5-6 seconds in where the playing gets a little softer. You can also try turning down your speakers because sometimes listening at a lower level can make that inconsistency a little easier to notice; if you put the loud notes on the edge of your hearing perception, the quiet parts will dip out of your perception. This isn’t something we can usually get away with doing in an actual live mixing scenario, but it’s a trick a lot of studio mix engineers employ when they’re trying to level out an instrument.
Now let’s hear what happens when I use about 10 dB of gain reduction along with 10 dB of makeup gain. First, let’s listen to the tone under compression:
[audio:comp/200hz-basskey.mp3]The things I notice here are some occasional big dips in level along with some smaller, subtle level fluctuation here and there. I also hear some soft popping especially on some of the bigger dips in level along the same lines as the popping we had with the snare.
If you could see the compressor in action on this clip, you would see is always applied gain reduction with a maximum of 10 dB of reduction. One thing I think this clip illustrates is gain reduction is not necessarily an indication of how much compression is happening. We often refer to gain reduction as compression, but that’s probably a habit we should break. The sections here where our tone doesn’t vary much in level means not much compression is really happening even though the compressor is probably applying 4-6 dB of gain reduction. Just because we have gain reduction, doesn’t mean we have compression because compression really only happens when we have actual changing level. If we had a lot of compression happening, we’d hear a lot of level variation in our tone.
Now let’s listen to the bass with these same compressor settings applied:
[audio:comp/bass-dbx160-10db.mp3]The first thing I notice now is the level of the instrument is more consistent. The transients on some of the notes are also accented from the character of the compressor which might help give them some punch to help cut in the mix.
These are just a couple of examples of compression in action. The point of all this is to take this technique and apply it to things with the gear you have so you can better understand how your tools work. And this technique isn’t just for beginners. You can use this to explore which compressors work best for different instruments. What do they add? What do they take away? Do they sound better when they are applying large amounts of gain reduction all the time or just a few dB here and there?
And don’t worry if all you have is one compressor to try. That’s always a good place to start. I’ve been working with audio for 25 years now, and I didn’t learn about all the different flavors of compression in one sitting. I started with the basics using one compressor, and I believe you’re always better off starting with one compressor, mastering it, and then trying another. Plus, while I personally like a variety of different compressors, one of my favorite mix engineers, Andy Wallace, is known for relying primarily on a single type of compressor for everything he does.
I’ll be back soon with another technique you can use to help understand compressors.

 Previous Post
 Next Post


Would there be any benefit to trying this technique with pink noise instead of a sine wave?
Maybe, but it probably depends what you’re listening for.
The benefit of using a sine wave comes from its steady state. It’s a solid piece of unchanging sound on its own so when you start doing things to it dynamically, it’s a lot easier to hear.
Pink noise on the other hand is much more random and not as stable dynamically. However, the wideband nature of pink noise might make some of the tonal shaping characteristics of a compressor more evident. For example, Andy Johns has said the predominant frequency of an instrument will be emphasized by a compressor. I haven’t tried it, but I wonder if using pink noise would demonstrate that.
Try it out and let me know. If I get some time, I’ll try it myself, too.
Thanks Dave! I’ll definitely try it out. I was definitely thinking about how compression affected frequency content. May even try and look at a before and after comparison on some kind of RTA.