
Pattern Control: Reflections on Drive 2009

Photo by Bill Whitt – Check Out His Blog
This is going to be a bit long so I’ll just start by saying the downloadable stuff is at the end of the post already bored by what is probably going to turn into senseless babble.
Before I dive in I just want to thank everyone for stopping by FOH to say hello and offer encouragement and positive feedback and the cool tweets on Twitter. The thing about mixing something like this–or anything for that matter–is you start by mixing what you want to hear, and then the people who pay you weigh in. All the opinions get mixed in together to where hopefully everybody’s happy, but at a minimum the people who pay you are happy; for the record, though, I was pretty happy with the results. But at that point, before the doors open and after the dust of the thing settles, it can sometimes be difficult to know where you’re really at in the grand scheme of the audience experience so when folks who were out of the loop for the weeks of prep on the thing walk up and say they enjoyed it, that really means a lot. Like a lot a lot. So thank you thank you thank you. If you were one of the many people grinning at Drive 09, I’m thrilled that you enjoyed it and I thank you for the big head it gave me. And for those who didn’t care for it, thank you for not killing my buzz. This was my third Drive Conference and by far my favorite one, and I’m glad I got to experience it with everyone who came.
Pre-Production
I don’t remember exactly when I got to start on pre-production, but I do feel like I started late compared to when I usually get to start on events of this scope. The plus side of this was that it didn’t feel like a crunch as much. The biggest change for this year’s conference was I was only mixing one session. At first I was a little apprehensive, but it really worked out well for me taking a lot of stress off my plate. I mixed the opening session, Dustin Whitt from Buckhead mixed the second session, NP’s associate Audio Director Luke Roetman mixed the MarriedLife showcase, and Chris Briley from Browns Bridge wrapped up the conference mixing the last session.
There were, however, a few unique audio challenges to Drive 09. The biggest one was figuring out how to do 16 live string players on stage; I’ll talk more about this in a bit. Next up was getting a digital console at Monitor World. Beyond that it was really just a matter of figuring out how we would handle having 4 different FOH engineers with 4 different workflows spread across the three main sessions and the MarriedLife Live showcase. I don’t know if we ever really figured the last bit out quite right so it might need some finessing when we try it again, and I’m thinking we most definitely will.
Live Strings
Let me first answer the biggest question I was asked about the strings: Yes, they were all real. I didn’t use any tracks in the mix, although, I had them available on at least one of the songs. There were 8 violins, 4 violas, and 4 cellos. The players were all from the Atlanta Symphony.
There were two main challenges for the strings:
– How do we mic them?
– How do we get them into the console within our channel limitations?
All instruments were close mic’ed. While there are no amps on stage, our stage can still get pretty loud between acoustic drums and PA bleed. It’s fine for a typical band, but when you start adding 16 acoustic instruments on stage it gets dicey so close mic’ing was the only way to really do it with the band. If you’ve been reading the blog for a while, you probably already know that I’m a fan of the DPA 4061 for strings. Between our campus’ mic inventories we were a few shy of the total needed so we rented all the additional mics for the strings from AudioVend out of Texas.
There was one exception to the mic’ing and that was during the string piece, Adagio, during communion. We put up a stereo pair of Sennheiser MKH8000 series mics–probably the 8040’s, but I can’t be sure–to try and get a little more natural sound, but they were only used on that song. The mics were demos one of our campuses was trying out, and I was told they’re getting used on soundstages for orchestral recording so I figured why not. So the Adagio piece was a combination of the close mics and the area mic’ed pair.
Beyond mic’ing, getting all the mics into our consoles was also an original concern since our split and our monitor console are locked at 56 channels, and we were already going to be pushing it. While there was talk at one point of sub-mixing the strings in our studio, when we found out we were going to have a digital console available for monitors the input limit was solved. We solved the split issue by renting some 4 channel BSS active mic splitters; I think there were 24 channels worth in the road case, but we only used 16 of them. This gave us all 16 strings on my console and on the monitor console.
Subs
I found this on Twitter during the talk for Session 1:
@jasonandmaria: #drive09 is so rockin’ my clothes are dancing from the subwoofer!!!
I can’t take credit for the subs. They were Chris Briley’s idea, and they were an incredible idea. I was actually a little apprehensive about it, but I’m so glad that Chris wasted way too much time convincing me and taking care of getting them in.
The subs were Meyer 700-HP’s, and there were a total of 12 evenly spaced around the stage; if memory serves there was about 4 feet between each box. Our existing sub arrays hanging stage left and right were completely unused which worked out because we needed their circuits for the 700’s. All the subs came from our Browns Bridge campus out of a couple of their family ministry environments. Chris coordinated all the delivery and install stuff and even rewired some power stuff to facilitate them. When Session 3 was over the subs were quickly removed from my campus, and there was much weeping and gnashing of teeth.
The subs arrived the Sunday night before Drive, and we had them all in by around 8:30pm. We tuned them in pretty quickly simply by running an 80 Hz tone into the tops and then the subs with the polarity flipped on the output to the subs. Chris stood middle-ish in the room while I started adding delay to the subs. When we had maximum cancellation, we flipped the polarity back on the sub output and left them. Then Chris did his magic tightening up the crossover between the subs and the tops. He is simply a master at getting the low end right, and I know that the next time we put subs in that room I’m going to beg him to come down and help.
Something that’s important to understand is why we had 12 of these incredibly powerful subs for a 2700 seat room. It’s not about power; in fact we had them dialed back…a bit. It’s about pattern control. When you have 2 stacks of subs set 60 feet apart, your low end coverage is uneven across the room. Period.
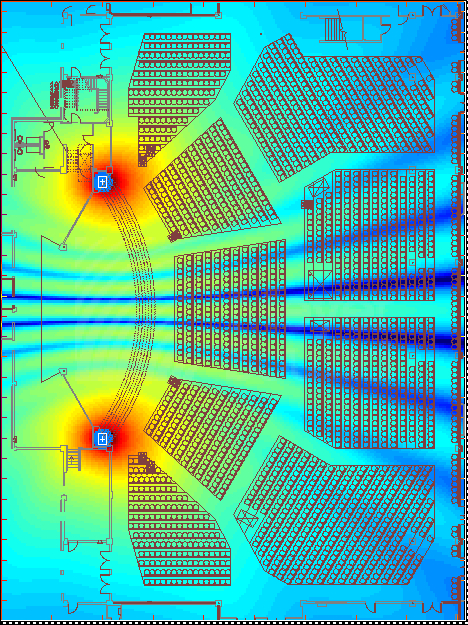
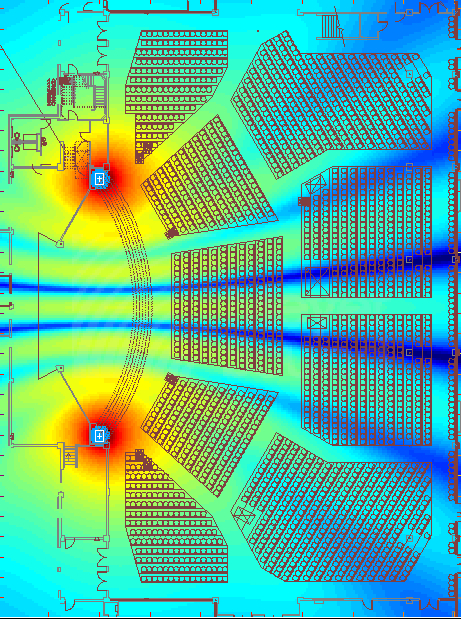
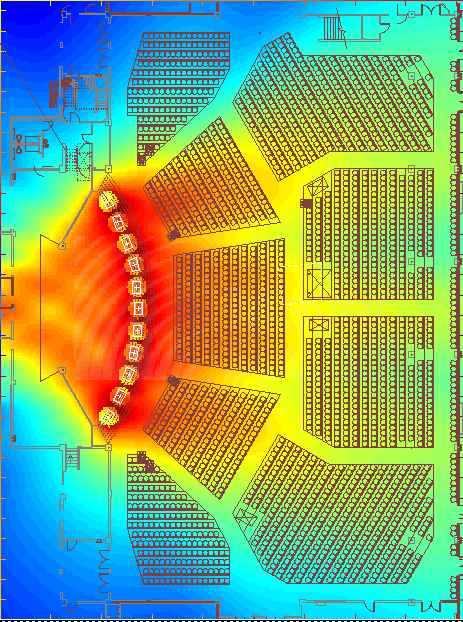 Everything will be great in the center because that’s where all frequencies combine at the same time. However, as you move out of center you immediately have time arrival problems due to the distance changing between the listener and each sound source(subs) and the tremendous wavelengths the subs are producing. As a result of those wavelengths, the frequency nulls from comb filtering can be wide enough to stand in, and the nulls will be in different locations depending on the frequency.
To demonstrate, I did a couple of quick models with MAPP online. The first two pictures are modeled with 2 subs in our room located in our existing sub locations; the power output isn’t representative, but the coverage is and what you should be looking at. The first photo shows a heat plot of 1/3 octave at 80 Hz and the second shows 50 Hz. Notice how the nulls(dark blue) cut across the FOH position at different locations.
With our actual arrays, there are more nulls at each frequency due to the increased power and the addition of acoustic reflections, but the bottom line is when you place subs far apart your coverage is uneven.
Contrast that with the third photo that is a model of a horizontal array of 700-HP’s at 80 Hz; this isn’t exactly what we had at Drive, but it’s close enough so you’ll get the idea. Notice how much more even the coverage is both in the room AND on stage. And the longer the array, the more pattern control you get at lower frequencies.
So that’s why we had so many subs. Now something I’ll add is that when Chris put those subs in, amazing things happened with our tops. There was a whole new level of clarity in those boxes. Briley has preached it to us many times, and I am truly a believer now: you have to get the booty right.
Mixing Session 1
The biggest challenge for me mixing Session 1 was the string section. I’ve never mixed that many strings before. I don’t know if sticking them with a rock band made it easier or harder because it was sort of a first. Simply managing the extra inputs was a challenge.
A big key to the whole string thing was spending a good amount of time using the tracks from rehearsal and going song-by-song checking blends between sections and making tweaks here and there. I put all the strings into a group where I used an onboard 31-band graphic EQ to ring them out from PA feedback, and then used some overall EQ and very light compression on the entire section via Channel G. I also had the Channel G expander on lightly to dip the section a few dB when the strings weren’t playing, but I’m not sure how effectively I had this dialed in. Plus the truth is I had the strings on a VCA that I rode on every song. Outside of the group, there was also probably some channel EQ going on on the individual instrument channels, however I still approached this in groups of instruments. So 1st violins all got the same EQ, cellos got the same EQ, etc. If there had been something really wrong with a particular player I would have gone after that, but I don’t remember any problems. On the Adagio for strings, I believe Channel G was either completely bypassed or toned way down since there was no band to compete with.
I dialed in the blends pretty quickly working with sections of 4 instruments using virtual soundcheck. Basically I’d push up a player and then push up the one next to it to match level. Then mute the first and push up the next one until I’ve worked through all four. I really had to do this in virtual soundcheck because getting the blend right in rehearsal was extremely tough due to ambient drums in the room along with the time constraints. When the players came in for rehearsal, we ran the songs through and hoped the recording didn’t fail because they were union players on the clock. There just simply wasn’t enough time to beat the songs into the ground with them, and they didn’t need it either.
Once blended, I panned the 4 instruments in a section hard left, hard right, mid left, and mid right; overall width of the entire string section was then controlled via the width control on the group. Then using multi-select to select a section of 4 instruments, I would balance each section against each other with the faders. I know I tried to touch the violin blend between the 1st’s and 2nd’s on each song because on some songs the stuff the 2nd violins were playing was more of a hook or contained something melodic that was more of a critical string part, but in that process the whole section probably got tweaked.
Bleed on the string mics wasn’t horrible, but it wasn’t great either. Bleed on any one mic was fine, but it was the additive bleed of 16 open mics that made it rougher. Although, the cellos which were closet in proximity to the drums had the worst bleed. We rotated the drums and added a bit of shield to try and tone it down as much as possible, but there’s only so much you can do with the geography of our stage and everything we had to cram on it. I was content with it and based on all the feedback from attenders and staff I’ll shut up there, but I know there are some things I’d probably try and do a little differently next time.
Strategic EQ was the key to getting everything to sit together. I also probably did a little more panning than usual on some of the guitars. Everyone really wanted the strings featured since it’s not something we do regularly so strings got spectral and imaging priority in the overall mix.
Beyond that, I really just spent a lot of time listening to the rehearsals and learning the songs. I knew the songs pretty much inside and out before band rehearsals even started, and when we added the strings I used the mixes from those rehearsals to learn the string arrangements so I knew when the strings were a texture and when they were a key hook. Then it’s just a matter of setting priorities for where I’m going to push things. It also helped that I’ve mixed the guys in that band so many times so I knew Reid’s going to go to the cool Strawberry Fields keys patch on the 2nd verse in Everything and how Ashley is probably going to play a fill coming out of the acapella section in Mighty to Save and where Todd or Eddie would do a vocal thing that I wanted to stick an effect on or even simply which verses they are quiet on or louder on. Every song. In and out. That’s key.
Outside of knowing the songs, console management was the next imperative. I always use Bank A on Venue for my main instruments where I might need to touch a specific fader within a group of faders(ex. VCA’s or Groups). This is typically drums, bass, keys, and main vocals. Bank B gets the rest of the instruments like electric guitars along with one off stuff. For example, there were some specific tracks for the opening number that I only needed for that song so they sat underneath the primary loops and tracks on Bank A that were unused on the opener. That way I can bank safe the stuff on B for the one song and never see it again the rest of the show. Bank C got all the strings along with some of the pre-session stuff. Then Bank D got spoken word and playback. I did a bit of reprogramming my VCA’s overall for the conference along with some little reassignments here and there on a per-song basis. Ultimately I get 95% of what I need from the band under my right hand and 95% of vocals under my left, and then I just drive with with the last 5% within reach. For probably 85% of the time during Drive I had a finger on each electric guitar VCA, the keys VCA, and the Strings VCA, and then I could still hit a VCA controlling vocal delay with my thumb when I needed it. Whether it’s Drive or a Sunday or a show or whatever, I go to great lengths to make sure I have things laid out on the console and assigned between groups and VCA’s so that I can quickly get at what I need, and I can live in the song while I’m mixing. It even goes beyond that to having my foot pedals assigned to do things I need.
Snapshots were heavily used on the session, but like every event/show/Sunday I mix I really just try and approach using them for a starting blend for each song along with changing FX patches on verb’s and delays. On Drive 09 there was also added bussing and routing changes to get all the FX sends right on the vocalists as they swapped out leading on different songs. Then there was probably some heavy EQ’ing of some of the loops on a per-song basis and maybe some stuff changing on guitars depending on whether strings were part of the equation; I know I was doing this at one stage in rehearsals, but when we put in the new subs the entire mix was affected so I think I ditched this to simplify some stuff since I had to essentially re-mix the entire show that night to be ready for the rehearsal Monday afternoon before the session that evening. But when I did remix the show the night the subs went in, I had already mixed the whole thing so many times things came together relatively fast, and I didn’t spend a lot of time on each song but I did hit every one of them. One other snapshot thing that I rarely do: on the song Mystery I automated the build for the band in the bridge. I think it was a 45 second crossfade, but I could be wrong. All I know is it was a guess I made after the last rehearsal–the original one for that rehearsal was too short–and we didn’t know if the length was right until we ran it in the session. I remember laughing at Chris Briley next to me because whatever the length was, it was just about dead on. I know prior to the session I did a lot of thinking and checking of snapshots and their order since I was changing patches and EQ’s on some things that I knew needed to get back to a previous setting somewhere within the session. Regardless of how true any of this is now that I’m a few weeks past, I knew everything that was going on the night of the session, and if I took some time to go back through my show file it would probably all come back to me.
Documentation
Below you’ll find a link to the input lists for the conference along with my show file from Session 1. The input list was primarily done in Google Docs, but I had to take it offline to use Excel at some points in the pre-production process. You’ll notice that the input list for each session is contained in one sheet. This is something that has helped in the past for me to keep a handle on everything that’s changing from session to breakout to session to breakout to session. I generally start a big event like this with a master input list–the first one–to get us through initial music rehearsals when different musicians for different sessions might come and go at random. This way we have everything on the desk for recording and starting to rough stuff in. Then we can strip away things and add things for each individual session while having an overview of the entire conference on paper and the flexibility within the digital consoles to move things into position on the desk. I used to break each session down into its own sheet and started doing that on this conference, but we ended up just leaving it in one big sheet and not printing things out. There are computers everywhere so we relied on the Google Docs version for most of the conference.
Drive 2009 Audio Documentation
So if you have any audio questions about the conference that remain unanswered above or even just general comments, please feel free to add them.


 Previous Post
 Next Post


Its been my mantra for many years, its all about the low end. If you get that right everything else is easier. I sometimes get strange looks from people who have not spent lots of time working this way, but after teaching them more details and letting them sit with it for a while most of the time they come back and agree that it really is all about the low end.
I know our team had a great time at DRIVE. We were both inspired and challenged. It sounded amazing! See ya soon.
Quick question about the vocal reverb and delay for you: Where I work, I’ve patched the send levels to a convenient place on our main fader layer. But due to a constrained number of faders, the returns exist in a pretty inconvenient place on another layer. People sometimes think this is weird and tell me the returns should be more accessible than the sends. Which way would you do it? How do you control effects at NPCC?
Bill, I think where you put things on a console can be a matter of taste. While there are definitely some industry standards for laying out things on an analog desk and a patch list, things seem to be shifting a bit with digital consoles. More and more I’m seeing guys put things so that they have what they need/want within reach, although some of the big chair guys have been doing this for years. With FX I’ve seen guys who ride FX sends and I’ve seen guys who ride FX returns and I’ve seen guys who set them and forget them.
For me, I typically only reach for the delay return, although lately I’ve been tweaking kit FX mid-song–probably just a phase for me, though. My FX sends are not typically within reach. My FX returns on the Venue are usually assigned to the FX return bank(s). Sometimes I’ll strategically place some of the stuff on the layers above the FX returns so that I can bank safe a particular FX return such as the kit FX. Beyond that I assign my delay return to a VCA so I can grab it any time. I also assign vocal FX sends to a mute group whenever possible so that I can pop them off if someone decides to start talking.
Thanks, very interesting! I ride the sends instead of the returns because for songs like Charlie Halls “Marvelous Light,” we need only certain words to repeat. Think: “Lift my hands and spin around, ’round, ’round, ’round…” If you just adjust the return, you end up getting a lot more than just “’round” included in the delay. Anyway, that’s why I do what I do. I was just curious what others did…
That makes perfect sense to me, Bill. For that kind of thing I would agree the send is probably a better place to grab it.