Revisiting The Shield
I know I’ve written a bit about drum shields a few times in the past, but here’s a quick refresher on my feelings towards them. I don’t like what drum shields do to the sound of the drums, but I do like what drum shields do for the sound of vocals. We have a large stage with a good amount of space all around our kit, plus we’re running music at the low end of concert-level sound so we’re not facing the same types of volume issues I know come up in a lot of churches. The primary reason I use a drum shield is to attenuate the cymbals bleeding into vocal mics on stage. As a bonus, I think it also makes for a better audio experience in the first couple rows nearest the drums on stage.
We experimented a few years back with taking the shield down for a while with mixed results. Some weeks it would be fine, but other weeks we’d have vocalists without as much power in their voices. Then sometimes we would just have too many vocalists on stage creating too many open mics. It got to the point where it seemed like we were moving the shield on and off every other week so I finally opted to just leave it up.
But the shield has remained a tension that’s goes through seasons of discussion. Video doesn’t like the way it looks because it’s hard to keep it as clean as we really want it, I don’t like that it makes getting at the drum mics difficult, and nobody is crazy about how it makes the drums sound. However, just this last week I had someone visiting from another church comment on how clear and nice the top end was on the vocals which was, once again, a reminder for me about how much the drum shield actually helps. I love the way drums can sound without a shield, but I think I get some pretty great drum sounds using one. Plus I know if we took a straw poll amongst attenders they’d prefer vocal quality over drums and vocals are typically better for me with the shield.
Recently, the shield conversation came up again around our Drive Conference so I’ve been back on my search for some kind of compromise between a shield and no shield. This week we started experimenting with one potential solution: cymbal shields.
I first got the idea for these after seeing photos of Butch Vig’s kit with Garbage. I thought Vig’s shields fit the Garbage aesthetic, but I didn’t think they’d get much love for looks with our kit. Then I saw that Deen Castronovo had some smaller shields of his own when he was out with Journey. I liked these a little bit better, although, Castronovo uses a lot of cymbals so there are a lot of these little shields, and in large quantities I’m not a fan of the look. Recently, Joel Yates over at Newspring turned me on to BDBaffles which are being made by Boone Daughdrill who drums for The Band Perry. Daughdrill’s baffles are large circular shields he says are about 24″ in diameter in an Instagram comment, and it seems that the folks who have used them like them. While some of the photos of BDBaffles made them look like they could be visually challenging for us, I did see a couple photos of them that got me thinking maybe we could make some variety of cymbal shield work.
My next thought was I just wanted to try the whole concept because I have to admit I was a bit skeptical if these could make enough of a difference. It finally dawned on me earlier this week that we have some old shield pieces laying around so why not just cut one into smaller pieces and see how they work?
For those wondering, our current shield is three sheets of 3/16th inch thick plexiglass making up three sides of a rectangle. Since the pieces are solid they look way better on camera and in the room than a traditional accordion style shields. The sides are about 3 feet long. I don’t remember the exact size of the center piece, but there is about a 2″ gap between the shield and the edge of our drum riser so I would guess 7 1/2 feet. The whole shield is about 5′ tall. The pieces are connected to each other with some L shaped glass display clips; I think there are 8 at each corner.
The whole thing is super easy to make. Anytime we need a new shield I call a local glass company, give them the dimensions of plexi we want, and it’s typically delivered within a day. Drum shields don’t need to be some fancy brand, boys and girls. You can put one together yourself if you know how big you want it and can use a telephone and a little bit of googling to find the display clips. Oh, and if you’re too lazy for Google, I believe these are the clips we’ve used for a long time.
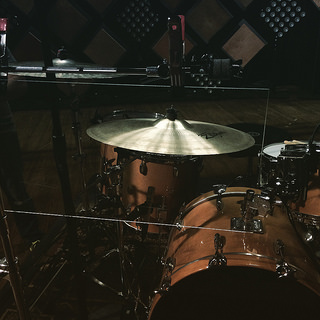
For this week’s experiment, we grabbed an old side piece of a spare shield and cut it into smaller pieces that look very similar to what Deen Castronovo uses. The pieces are roughly 24″ wide by 15″ tall. I did a very rough measurement of some cymbals and found they had about 8″ of potential vertical movement. I can’t remember seeing any cymbals on our stage bigger than 22″ so it seemed like those dimensions would be enough to start with. We then clamped the plexi to some cymbal stands and started our testing.
I set up a vocal mic downstage in our typical lead singer’s position roughly 10-15′ from the drums while our production director climbed behind the kit to bang on it a bit. I recorded his playing through the vocal mic with our full shield, our prototype cymbal shields, and no shield. The results are below. While I did bring up the overall level on the recording before I split it into clips, there is no other processing on these. These clips are also uncompressed .WAV files, and I recommend listening to them in the order they’re presented.
Vocal Mic – No Shield
Vocal Mic – Cymbal Shields
Vocal Mic – Full Drum Shield
For additional comparison, here is our stereo overhead mic.
Overhead Mic – No Shield
Overhead Mic – Cymbal Shields
Overhead Mic – Full Drum Shield
In these clips I felt like the cymbal shields definitely tamed some of the harshness and level of the cymbals in the vocal mic which is really what I’ve been after with any shield use. The full shield makes the biggest difference in the vocal mic, but the drums in the overhead aren’t as good. I can hear the transient of the snare smearing from the shield reflections, and it’s almost like the drum sounds a little choked with the full shield up. The cymbals also sound washier with the shield up. With no shield the drums sound more natural and punchy. I don’t think the cymbal shields are far off from a no-shield option, either. In the cymbal shield overhead clip the snare initially sounds a little thinner, but I think that’s more playing technique because halfway through it sounds more like the no-shield version.
Based initial testing I decided to commission a full build which basically amounted to figuring out a way to mount the cymbal shields permanently. Our production associate, Josh, took a thin piece of aluminum for this and drilled a hole in it so we could mount the aluminum on a cymbal stand. Then we used the same clips from our full shield to attach the plexi to the aluminum.
We did a full test with the cymbal shields at rehearsal on Wednesday, and the results were interesting to me. The overall level of cymbals in the room seemed like it came up, but from where I was sitting I didn’t find it uncomfortable or harsh. I solo’ed up the vocals in virtual soundcheck after rehearsal and was happy to find the cymbal levels in the vocal mics during bash sections of songs were relatively controlled.
I had one vocalist that made me question whether the cymbal shields worked so I imported a track of her recorded a couple weeks ago with the full shield up. I was happy to discover that while the amount of bleed in her mic was relatively the same between rehearsal and the full shield week, the bleed from the cymbal shield recording was actually a bit smoother and lacking some of the top end harshness I heard with the full shield up.
It wasn’t really a surprise, but the overall sound of the drums was also noticeably improved by using the cymbal shields. I had exactly the same drummer as the previous Sunday playing the exact same kit, and everything was tighter and punchier. Most surprising to me was the improvement of the kick drum. I expected improvements on the snare and toms since their sound is a blend of close mic and the overheads. But the kick is really just from the close mic, and it tightened up quite a bit using only cymbal shields.
So far, I’m liking this approach. I like how things are sounding, and I also like the minimalistic nature of it where you only shield what you need to. I might use more shields if we have more vocals on stage such as for a worship night, but if there are only a couple vocals and they are strong I might be able to pull the sahields off completely. They’re fairly easy to move and reposition so it opens up some new possibilities.
The only downside I have right now is I’m still not sure about the look. I’ve had some folks comment they look really cool, but I’m still not so sure. We’re going to roll with the shields for Sunday so we’ll see what comments they generate. We’re also talking about potentially bending them so they wrap around the cymbals a little more.
As for their overall effectiveness, I think it will take a few more runs before we really have a handle on how well they work. That said, the results this week were incredibly promising. The cymbal shields are doing what I hoped they would do so it’s hard to ask for more than that.
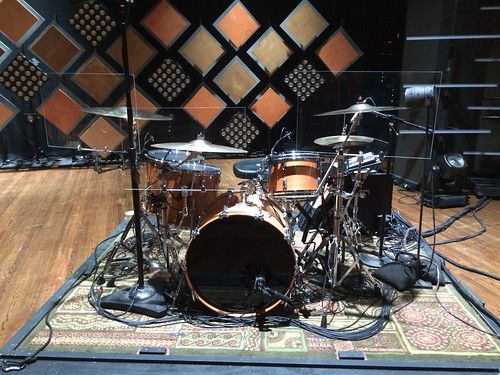
Final Setup For Sunday


 Previous Post
 Next Post


Now you just need to etch them and add some edge lighting: http://www.instructables.com/id/Edge-Lit-Displays/
This may be overthinking it, I don’t know because we have always just bought shields, but does it matter if you get extruded or cast acrylic material for your shield? My reading makes me think cast would be more clear, but in real experience does it make that much difference?
To be honest, I didn’t know there was a difference. When I’ve ordered shields in the past, I just called a local glass company, told them the dimensions of the pieces, and told them how thick I wanted the plexi.