Taming a Room
As I’ve been doing more and more work in my studio, it was becoming apparent my studio’s acoustics could use a little help. If you are trying to set up any kind of studio-esque environment whether it’s a broadcast room or a traditional studio for music or video production applications, this article might be for you.
My room actually felt pretty good to me as it was. There was a fair amount of natural absorption and diffusion courtesy of the stuff in the room(curtains, carpet, miscellaneous gear, and junk), and I think my studio in its previous state sounded better than some of the professional studios I’ve worked in over the years. I’ve had a lot of success working in here so I was a little hesitant to mess with things.
Of course it wasn’t perfect, and where I’d run into problems is the same place all smaller rooms run into problems: low frequencies. This manifests itself the most when I’m mixing music. Everything sounds great in my room, but when I check it in my car everything works except the low end. Then it’s a back and forth process between studio and car until I get things where I want them.
In my opinion, I should be able to print a mix, check it, make a couple notes, apply them, and print a final mix to deliver. Unfortunately, the acoustics in the room made it very hard for me to judge the low end properly which added extra time to my mix process.
So what’s actually happening in my room and pretty much every room?
*** Acoustics 101 ***
In a nutshell, acoustic energy from my speakers hits my walls and ceiling and then bounces off and around the room. Through this process the wall and really any hard surfaces in the room, in effect, become additional speakers in the room.
The first issue with these extra speakers is they don’t share the same frequency response as my actual speakers, although, even if they did that wouldn’t fix the bigger issue: the reflected sound is out of time with the sound produced by my actual speakers. These timing differences create a myriad of phase problems that manifest as peaks and nulls in the frequency spectrum throughout the room.
The solution is to strategically place absorption in the room to stop the walls from reflecting acoustic energy back to the listening position. That way the majority of what I hear while mixing is coming from my speakers.
*** End Acoustics 101 ***
Now, there is often a knee-jerk reaction when treating acoustics to overdo it and completely deaden the room. Some engineers may actually prefer to work in a completely dead room, however, that’s not really my thing. I want my room to sound natural, and dead rooms are not natural to me. [Insert obligatory jab at dry sounding 70’s records here]. I want a room that feels good where my mixes translate to other environments so that’s part of why I’m not going crazy with treatment just yet. The room felt good to begin with, so I just want to help it a bit as necessary.
Since I was home this week while my wife is traveling, I finally started building some acoustic panels to help tame my room a little more.
Why build panels instead of just getting some of that acoustic foam?
I’ve treated studios with foam before and worked in studios with foam. It definitely works for some applications, but mostly high and mid frequencies. If you have flutter echoes and slaps, foam can probably help. The problem is it doesn’t do very well with lower frequencies unless you get it really thick, and that’s where my problems are. Plus, I’m not as crazy about the look of foam or installation of it since it typically involves gluing things to the walls. Panels are a little more portable.
Why not buy pre-built panels?
Honestly, I would have preferred to buy pre-built panels. They look better than anything I can build, work great, and many of the acoustic manufacturers offer great support and advice on treating a room. The problem, though, is they are expensive.
For example, 3″ deep 2′ x 4′ MiniTraps from RealTraps run about $220 a piece. What I would really love to do someday is build an Attack Wall with ASC TubeTraps, but the TubeTraps are even costlier. There are other absorption panels around that are a little less expensive than these options, but it still turns into quite an investment when you want to put a good amount of absorption in the room.
The panels I made are slightly smaller than the MiniTraps at about 1.4′ x 4′, but I built 12 of them for less than $200 in materials. For those of you without a calculator, that works out to under $20 in materials per panel.
This reminds me, DIY acoustic panels aren’t just for studios. I was at a church earlier this year that had recently moved into new building, and they built their own acoustic panels which saved them thousands of dollars. If you’ve got some crafty volunteers and/or staff, there’s no reason why you don’t build these for your room as well. I wouldn’t do it for a really big room, but if you’re in the 500-1000 seat range, it’s probably doable.
I’m pretty inept when it comes to building stuff. In fact, I think this might have been my first construction project, ever. So right there you should guess that these aren’t overly complicated to put together.
There’s nothing to the design. You take insulation, build a wood frame around it, and cover/wrap it in a breathable fabric. There are tons of YouTube videos and articles floating around the interweb on how to make these type of panels so I’m not going to get into many specific details.
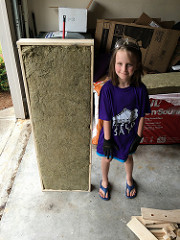
I put my panels together on the floor of my garage, and I built them mostly by myself with a bit of help here and there from my 8 year old daughter; so, again, they’re not very complicated. The hardest and most time consuming part for me was wrapping the fabric. It got a little easier once I got a system in place for doing it, but it’s not something I would rush to do again unless I really had to. I’d guess I had it down to about 20 minutes to wrap each panel at the end.
It took a couple days to put all 12 panels together, but if I subtract all the breaks I took to tend to business, various trips to Home Depot and the fabric store, and simply getting out of the Atlanta heat for a bit, I’d guess it probably took a little over a day for me to build everything. With an adult helper or two and a more comfortable working environment, they probably would have gone much faster.
Here’s the materials list with rough pricing:
- Roxul 3″ Safe N Sound Insulation – 12 pieces – $46
- 8′ 1×4’s – 17 @ $2 a piece – $34 total
- Wood Screws – $8
- Wood Glue – $3
- Burlap (we probably bought too much) – $70
- Staples – $3
- Screw Eyes – $6
- Picture Wire – $15
- Wall Hooks – $4
The total is about $190.
You’ll notice I used Roxul Safe N Sound for my insulation, and some of you are probably wondering what it is. The traditional material used in acoustic panels is rigid fiberglass with Owens Corning 703 or 705 being the most popular. Roxul Safe N Sound is made of Rock Wool which is a fiberglass alternative that’s not stiff or rigid, and I’m told it’s a little easier to work with than fiberglass. It tends to cost less than OC 703, and it’s also available right off the shelf at Lowes or Home Depot unlike OC 703.
Here’s a comparison of absorption specs courtesy of Bob Golds:
703, plain 3"
125hz	250hz	500hz	1000hz	2000hz	4000hz	NRC
0.53	1.19	1.21	1.08	1.01	1.04	1.10

Safe N Sound 3"
125hz	250hz	500hz	1000hz	2000hz	4000hz	NRC
0.52	0.96	1.18	1.07	1.05	1.05	1.05

Auralex 3" Studiofoam Wedges
125hz	250hz	500hz	1000hz	2000hz	4000hz	NRC
0.23	0.49	1.06	1.04	0.96	1.05	0.90
As you can see, the specs are very close between Safe N Sound and 703. Notice I also included specs on Auralex Studiofoam here. You can see the foam does well above 500hz, but not as good below which is where most of my issues are.
An advantage I like with 703 is the panel sizes are slightly larger, and I would have also liked the extra absorption at 250 Hz that 703 has. However, Safe N Sound’s cost savings and the fact I can buy it right off the shelf won out.
For fabric, I employed the assistance of my wife. The hard thing about fabric is you need something breathable or else the fabric turns into an acoustic reflector. Most of what we found was too heavy so after 45 minutes at the fabric store we settled on a tried and true solution: burlap.
The problem with burlap I didn’t know about is it stinks. One of the solutions I found was to put the burlap out in the sun so I cut the pieces and had my daughter lay them out on our driveway. This seemed to tone down the smell to a tolerable level so I could work with the fabric.
That’s all for now on these panels. As I’m writing this, I’m still in the process of getting them in place and putting my studio back in order. I’m putting all the photos I took of the process HERE so feel free to take a look.
I’ll probably do a follow-up article once the project is done. In the meantime, if you have any questions about these you’d like to me to tackle, please add them in the comments and I’ll try and answer them as best as I can.


 Previous Post
 Next Post


I was into audio in the 70’s when we read Hirsch-Houck labs reviews, used big amps to power acoustic suspension speakers, and dreamed about Ohm Walsh speakers (I heard a set one time and still remember my amazement). Now I see most people using earbuds and portable bluetooth speakers. High end these days seems to be designer headphones.
So do you ever consider mixing with headphones since that may be the majority of how it will be heard?
I check things on headphones and/or earbuds at times, but I don’t mix with headphones. Listening and playback systems are constantly in flux. When I was a kid we had Walkman’s. We also had boomboxes along with traditional stereos, portable stereos, car stereos, clock radios, etc, etc. Today a lot of people are getting their music consumption via YouTube so add laptop speakers and smartphone speakers to the mix.
A key to mixing, in my opinion, is having an accurate representation of what’s happening. This is usually easier to get through speakers in a treated room. The problem with using many of those consumer playback systems as a primary mixing platform is they typically lack accuracy. The majority of content that is consumed is still created in more accurate listening environments using speakers. It’s a time tested method to mix in a way that will translate to the widest variety of listening mediums.
One exception to this I can think of, though, is if VR begins to rise in popularity. VR will likely need a different monitoring approach since it will rely on binaural hearing so you’ll have to strap something to your head for the imaging to work properly.